
Reveni Labs Spot Meter
User Manual and Operating Instructions
Revision: 9
Date: 2022-07-24
PDF Version
Having issues? Please check the troubleshooting guide and if needed, please contact us
Layout and Features


Key Features
Spot metering (~1 degree)
Bright internal OLED display
Simple controls and menu
Single, 2-spot average, Zone and Precision Method metering modes
Aperture or Shutter priority
Exposure compensation in 1/3 stops (-3 to +3 stop range)
2x Alkaline LR44 battery
Dimensions: 2.8"(71) L x 1.2"(30.5) W x 1.5"(38) H inches(mm)
Technical Data
Shutter speed range - 1hr – 1/8000th sec in 1, ½ or ⅓ stop increments
Aperture range - F0.7 – f1024 in 1, ½ or ⅓ stop increments
Film ISO range - ISO 1 – ISO 12800, see “Setting Film ISO” for full list
EV Range: - EV 2 to EV20 in 0.1EV increments (@ISO 100)
Getting familiar with your meter
The Reveni Labs Spot Meter represents a new concept in spot metering. Instead of using a through-the-meter viewfinder system, the Reveni Labs Spot Meter uses both of the user’s eyes to create a virtual viewfinder. One eye is obscured by the meter and receives only data and the aiming reticle. The other eye observes the scene. The user’s brain combines the two images into a composite image that makes the reticle and data appear to float in front of the scene.
Battery
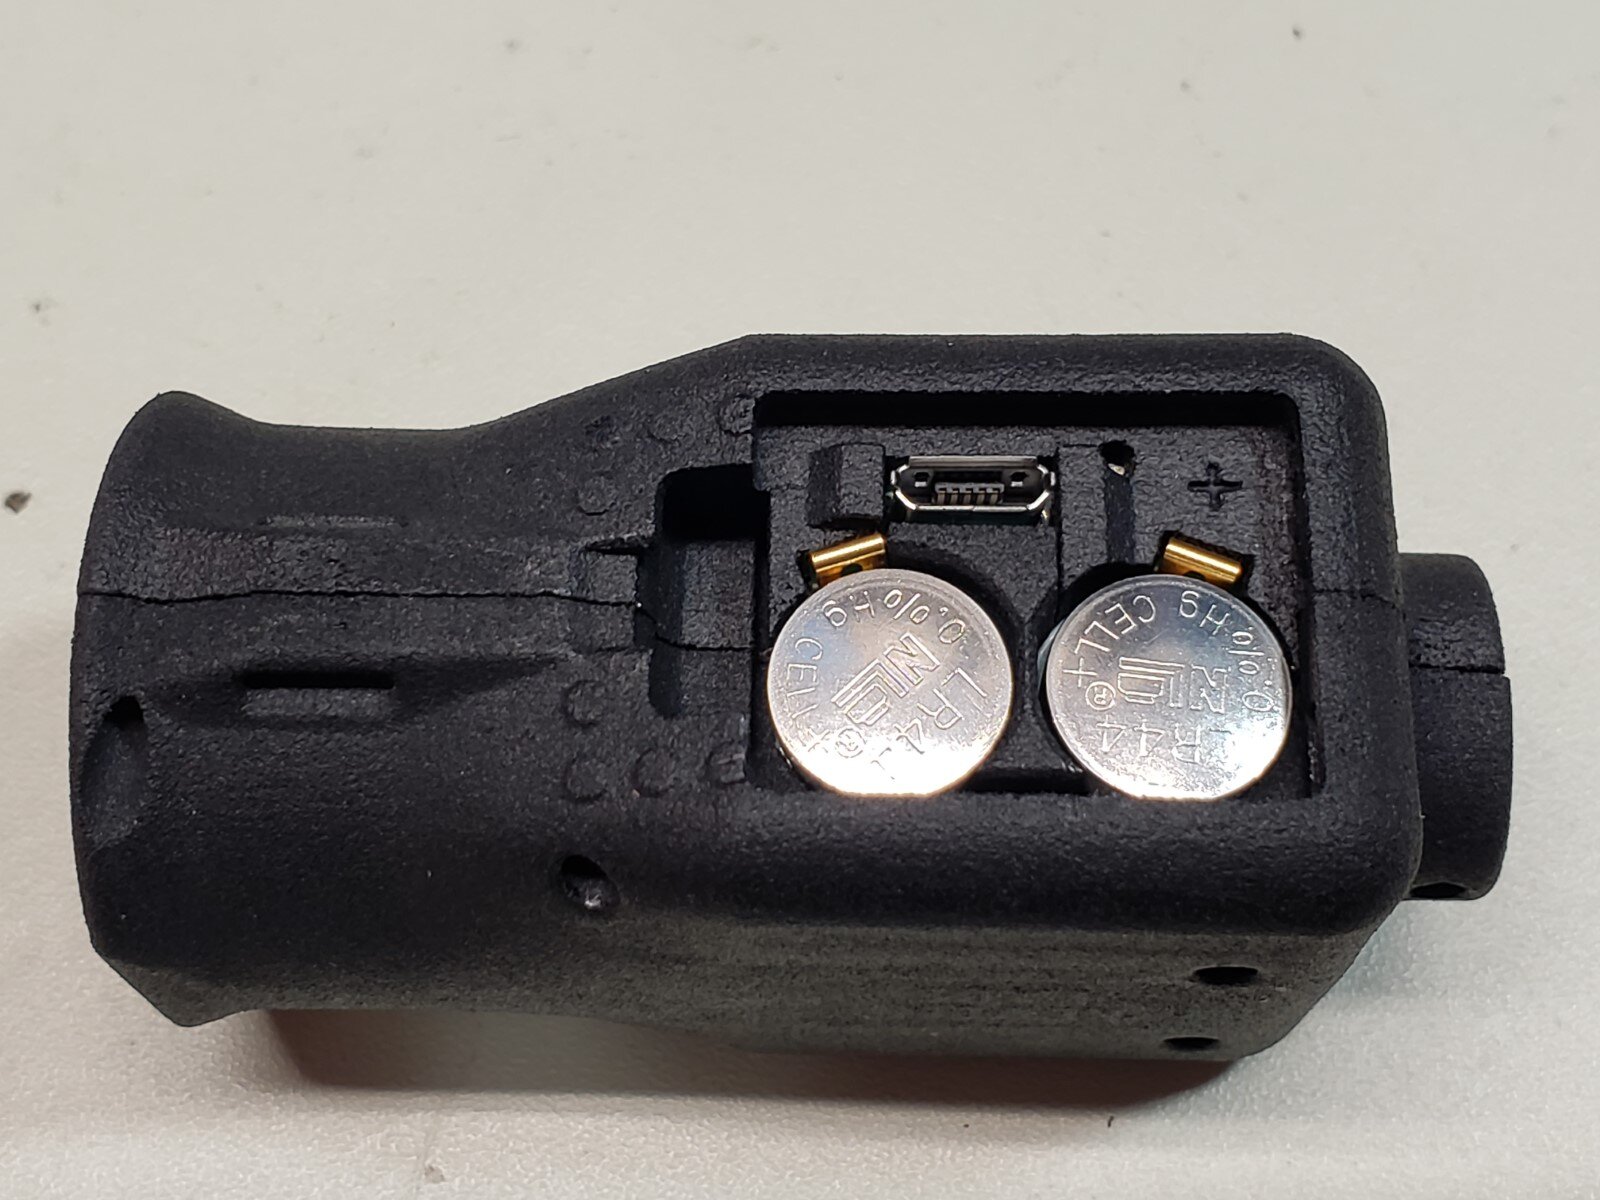
The Reveni Labs Spot Meter uses two alkaline LR44 (A76, AG13) coin cells which are commonly available. Expected battery life for quality coin cells is approximately 3 hours of total use. Reveni Labs recommends to only use high quality name brand alkaline cells in the meter. The battery type must be Alkaline as Silver Oxide or Zinc Air cells cannot provide the power required.
Using the AAA Battery Pack, runtime is extended to 20 hours or more. Additionally, the cold weather battery performance is greatly improved.
To install the AAA pack, remove the cover. Hook it onto the bottom of the meter and press down the release tab to lock it in place. Then, insert the batteries and put the cover back on.
It is not recommended to store the Reveni Labs Spot Meter for more than 3 months with the battery installed.
The battery must be inserted with the Positive (+ marked, flat side) facing out the bottom of the Spot Meter, otherwise the meter will not work. The battery holder is designed to prevent the battery from making contact if the holder is inserted upside down.
Batteries inserted (+) facing out the bottom of the meter
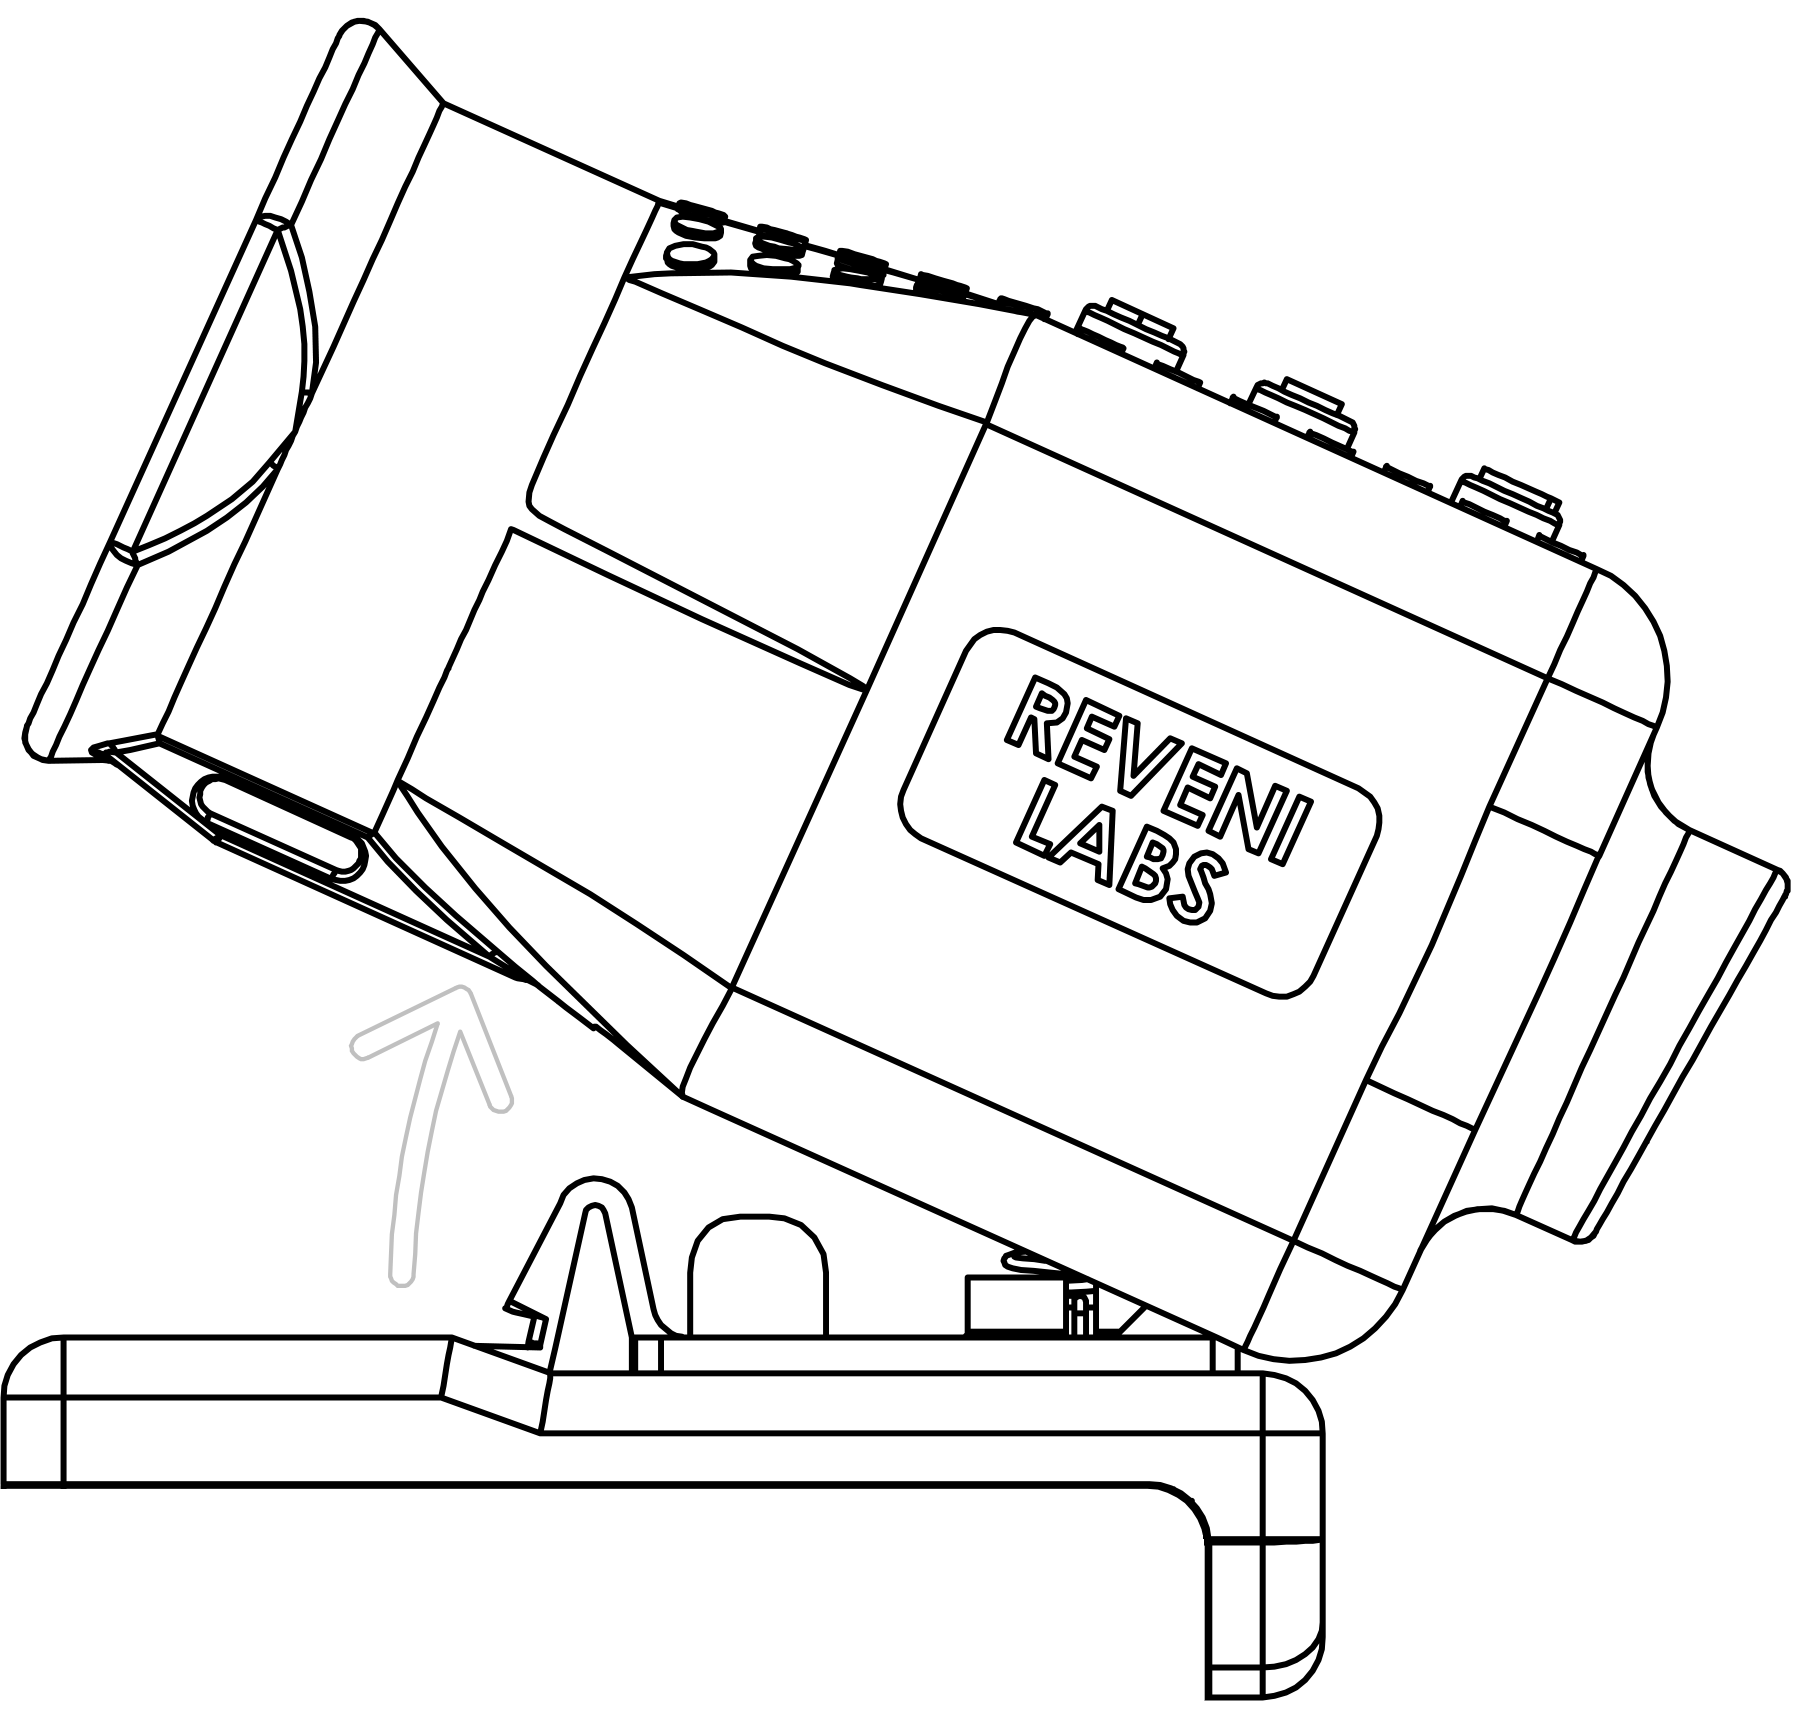
Attach the AAA pack before inserting the AAA batteries. Press the release latch down to lock in place
Take care to store any batteries outside of their manufacturer packaging in a safe manner. If the battery contacts become shorted by a metal object such as keys, it can cause burns or possibly start a fire.
Low Battery
If your Reveni Labs Spot Meter does not turn on, or the screen flashes but does not remain on after the Power/Sample button is released, the batteries are likely too low. Waiting for the batteries to “recover” can sometimes get additional use from it, however it is recommended to replace with fresh batteries once this begins to happen.
Dispose of drained batteries in accordance with your local laws.
Physical Care
The Reveni Labs Spot Meter is designed to be rugged and sturdy, and should not break from regular use. It is not intended to be exposed to excessive moisture such as direct raindrops, or operated by wet hands. There is the possibility of permanent damage if it is exposed to water. If the meter does get wet, remove the battery and wait for it to dry or place inside a sealed container with uncooked rice to absorb the moisture.
Dirt can be wiped off with a slightly dampened cloth or dry brush. Dust can be blown away with a dry blowing device such as a compressed gas duster or puffer bulb.
Take care not to strike the lens with any object, as it may scatch.
Do not dismantle your Reveni Labs Spot Meter as there are no user-serviceable parts inside.
Using Your Meter
Please ensure that you are familiar with the operation of your meter and that it is providing consistent, accurate readings prior to taking your photographs. Incorrect operation can impact the accuracy of your reading. Always keep in mind the “Sunny 16 rule” to ensure that your meter is providing a reasonable reading. This will ensure that severe exposure errors do not occur.
Be Careful In The Sun
When using the meter in the sun, take care to avoid aiming the rear lens towards the sun. The lens acts as a magnifier, creating a hot spot on the surface of the screen and can cause cosmetic damage. This can happen quickly in the summer sun or in regions closer to the equator. Yellow spots can appear on the surface of the screen but the screen does continue to work.
Sunny 16 Rule
The Sunny 16 rule is a simple estimation scheme to help guide a photographer in estimating the correct exposure in some lighting situations. The rule is, in broad daylight, set your aperture to f16 and set your shutter speed to the reciprocal (1/X) of your film speed. For example:
Sunny day, ISO 100 film (EV 15): f16 and 1/100 is the ideal exposure.
This method often may reach a shutter speed which the camera may not offer. In this case, rounding to the nearest shutter speed is sufficient. In the above example, 1/125 would be the correct shutter speed choice.
By understanding this estimation rule, you can gain a sense of approximate correct exposure and provide yourself a “second opinion” to ensure that your use of the Reveni Labs Spot Meter was correct.
Holding and Aiming
With both eyes open and focused toward the subject, you will be able to see the data in your obscured eye and the scene in your other eye. Move your head to place the reticle over the object you wish to meter.

This zone is caused by scattering light within the meter cone and sensor lens. A simulated real-world example is shown to the right, where the user is attempting to meter a shadowed area when a sunlit area is within the zone of influence. The considerably brighter sunlit area will skew the meter reading higher than if the shaded area was not measured so closely to the shade-to-sun transition point.

Hold the meter in your preferred hand with your index finger toward the viewing lens. Hold in front of your preferred eye so your hand does not block your other eye. The meter only needs to be close enough to your eye that you can see the corners of the internal screen.
Press and hold the Power/Sample button until the internal screen comes on and readings begin

Aiming Reticle Aiming is accomplished using the reticle in the center of the screen. The reticle consists of an inner and outer circle. The center circle represents a 1 degree cone of vision, this is approximately a 2”(50mm) target at a 10 foot(3 meter) distance. The surrounding outer circle represents approximately 5 degrees of view and is a “zone of influence” where a bright high-contrast area inside of this circle will impact the reading within the center circle.

Aiming at Close Subjects
When using the meter, parallax angle between your two eyes causes a small aiming error. This error is negligible beyond 10 feet (3 meters) but is more significant at closer distances. When using your right eye, the target area begins to move left of the reticle centre. When using your left eye, it moves right.
This can be demonstrated by metering towards a common lightbulb from approximately 10 feet, the brightest point detected will have shifted a few inches away from the centre of the bulb.
Metering at close range is best done on subject areas considerably larger than the 1 degree spot, to ensure the meter is aiming at an equivalently lit area of the subject. Metering off a larger equally-lit subject or grey card placed in the scene is also useful if the actual subject is too small.
Power
Press and hold the Power/Sample button to turn the meter on. The starting time for the meter is 2-3 seconds. Holding the power/sample button will make the meter take a continuous reading. This is the recommended way to capture a reading to ensure you are getting a consistent value off of the spot you are aiming at. The meter will automatically turn off after the prescribed time.
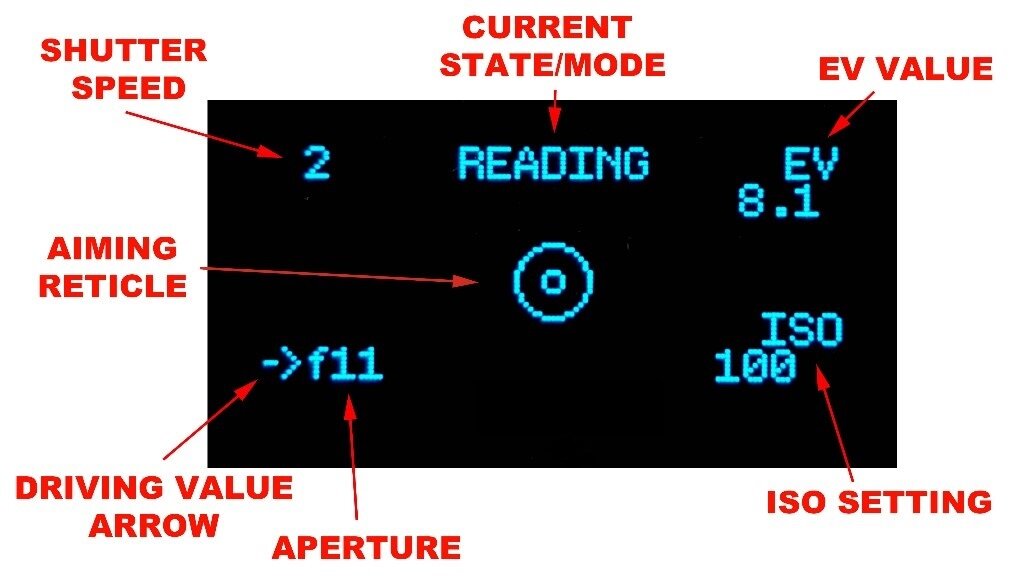
Sample Screen
After taking a reading the meter will display the calculated aperture and shutter speed. The aperture is always shown on the bottom line (denoted with an “f” symbol) and the shutter is always shown on the top line. When exceeding 1 second, an “s” will be shown next to the time. When under 1 second, the reading is assumed to be “1/X” with the “1/” implied to save screen space. With speeds exceeding 1/1000, the trailing zeroes are replaced with “k”.
In Aperture Priority mode, an arrow points to the bottom line of the screen. When in Shutter Priority mode, the arrow points to the top line of the screen. The value that the arrow points to is the “driving” value, meaning it is controlling the calculation. The value that the arrow isn’t pointing to is the “driven” value, which is calculated based on the driving value and the other meter settings.
Where the arrow points is the value that will be adjusted if the user presses the Left or Right buttons. The driven value will be recalculated each time the user presses the Left or Right button, but a new reading is not taken unless the user presses the Power/Sample button again.
While the light being measured may have infinite variation, cameras do not and therefore the reading must be rounded. The Reveni Labs Spot Meter has three options for this; whole stop, half stop and third stop increments. Depending on the feature set of your camera and your own personal preference, you can select the aperture/shutter resolution you desire.
What are “Stops”?
A “stop” is a colloquial term for a relative amount of light. Adding a stop is to double the amount of light being exposed to the film, and subtracting a stop is to divide the amount of light by half.
Most cameras have their available shutter and aperture settings divided into 1-stop increments, so each adjustment either doubles or halves the amount of light striking the film. Other cameras offer more granularity in settings, and can make use of the higher resolution of half or third stop increment modes.
The ISO film sensitivity system also follows this trend; every doubling of the ISO number requires only half the amount of light to expose the film the same amount. Halving the ISO requires a doubling of the light to expose the film the same amount.
EV (Exposure Value)
Exposure Value is a common way of quantifying photographic light levels irrespective of a specific shutter speed or aperture size. The EV scale is exponential and therefore matches the standard adjustments of doubling or halving the amount of light as seen by the film when adjusting either ISO, aperture or shutter speed.
A specific EV number correlates to a specific amount of light striking the film, and so can be achieved by an infinite combination of aperture and shutter speed selections. In this way, it is effective at divorcing the exposure value from the camera itself. Since the same amount of light will produce a different exposure on a different ISO film, the EV system has to take into account the film ISO to be accurate.
Main Menu
Enter the menu by quick pressing the MENU/COMPARE button (marked “M”). A longer press will make the meter being operating in COMPARE mode, which is covered later on in this manual.
The Reveni Labs Spot Meter has the following menu options:
METERING MODE
ISO
PRIORITY
EXPOSURE COMPENSATION
STOP INCREMENTS
CONFIG. MENU
These modes will be discussed further in the following pages.
Metering Mode
The Reveni Labs Spot Meter offers four metering modes to assist the user in getting the correct exposure.
Single
Single mode is a simple metering mode in which the user samples a spot and the meter calculates the settings required to render that spot as a middle tone.

The two images above show the single mode in action. The user holds the Power/Sample button and the top of the display shows “reading”. The meter reads the spot brightness and calculates the shutter/aperture combination in real time. When the Power/Sample button is released, the screen displays the “locked” text, and the user can adjust the driving value up or down to change the shutter/aperture combination they are presented with.
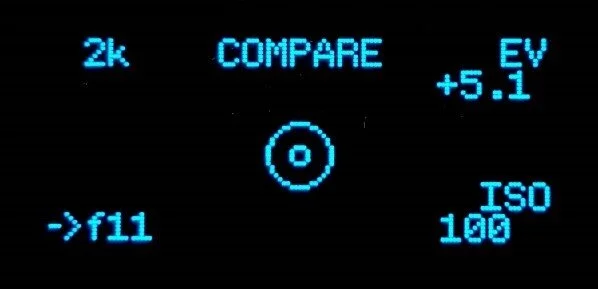
Pressing and holding the Menu button will put the meter into “Compare mode” and allow the user to view the difference in relative EV in real time across the scene.
Average
Average mode allows the user to capture two spots; the darkest shadow they want detail in, and the brightest highlight they want detail in. The meter will calculate the middle grey EV from these two readings and put the computed shutter/aperture values on the display.

From the menu, select MODE: AVERAGE
Press and hold the Power/Sample button and aim at the darkest shadow that you wish to capture detail in. (The shadow EV is displayed in real time (image 1)
Release the button to lock in the reading.
Press and hold the Power/Sample button again and aim at the brightest highlight you wish to capture detail in (image 2)
Release the button to lock the reading.
Press the Power/Sample button to compute the results and display the shutter/aperture values and the average EV of the scene.
Pressing and holding the menu button will now display a real-time comparison EV for wherever you aim the Spot Meter.
Zone System
The well-known Zone System invented by Ansel Adams and Fred Archer has been the standard for professional photographers for decades. The Reveni Labs Spot Meter caters to those who enjoy using the Zone System by allowing them to sample and assign Zones, then make comparisons to other parts of the scene and see the resulting Zone placement in real-time, without any mental math.

From the menu, select MODE: ZONE
Press and hold the Power/Sample button and aim at the desired tone in the scene
Release the button to lock in the reading
Press and release the Power/Sample button to move to the ASSIGN ZONE screen
Use the Left/Right buttons to assign the zone you want for the selected tone
Press and release the Power/Sample button to compute results and display the zone 5 shutter/aperture values and zone 5 EV.
Pressing and holding the menu button will now display a real time comparison EV, and the calculated zone for wherever you aim the Spot Meter.
Nick Carver’s Precision Metering Method (P.M.M.)
Reveni Labs has partnered with professional large format photographer Nick Carver to implement his Precision Method to Manual Metering into the Reveni Labs Spot Meter. The Precision Metering Method offers natural text descriptors as well as adjustable latitude to match your film stock.

Select MODE: P.M.M in the menu.
Press and hold the Power/Sample button and aim at the desired tone in the scene. The true EV of this tone is displayed at the bottom (image 1).
Release the button to lock in the reading
Press and release the Power/Sample button again to go to the “Place Tone” screen.
Use the Left/Right arrow buttons to select the descriptor for the tone you chose (image 2). The options are:
TEXTURELESS BLACK
NEARLY BLACK
VERY DARK
MEDIUM DARK
SOMEWHAT DARK
MIDDLE GREY
SOMEWHAT LIGHT
MEDIUM LIGHT
VERY LIGHT
NEARLY WHITE
TEXTURELESS WHITE
6. Press and release the Power/Sample button a final time and the meter will calculate the effective middle grey EV of the scene, as well as the shutter/aperture values to match (image 3).
7. Pressing and holding the menu button will now display a real time comparison EV, and the calculated descriptor for wherever you aim the Spot Meter.
The config. menu section below discusses how to change the latitude/dynamic range of the P.M.M. mode descriptors to match your film stock’s latitude.
CINE MODE
CINE mode converts the shutter speed into a combination shutter angle and framerate display. The mode is naturally shutter-priority and can’t be changed to aperture priority. The LEFT and RIGHT arrow buttons vary the currently selected value. To switch from changing the shutter angle to framerate and vise versa, enter the menu, navigate to the PRIORITY MODE screen, and change it there.
Setting film ISO (film sensitivity or “speed”)
To meter accurately, your Reveni Labs Spot Meter must be set to match the ISO of the film currently inserted in your camera. Be sure to change this setting whenever you switch rolls or use your meter with a different camera.
Press the menu button to cycle through menu options. Stop when the top line of the display shows “ISO”.
Press the Left and Right buttons to adjust the ISO setting up or down to the desired value. The full range of ISO settings available are:
ISO 1, 3, 6, 12, 25, 32, 50, 100, 125, 160, 200, 250, 320, 400, 800, 1600, 3200, 6400, 12800.
Press the Power/Sample button to save your selection and take a new reading at the newly selected ISO.
For unavailable ISO ranges, manipulation of the exposure offset feature can be used to achieve the correct exposure for in-between values.
Priority Mode
The Reveni Labs Spot Meter can perform its calculations based on two modes; Aperture Priority and Shutter Priority. In Aperture Priority mode, the user selects the aperture they wish to use and the meter will calculate the shutter speed required to get the correct exposure. In Shutter Priority mode, the user selects the shutter speed and the meter calculates the aperture. This offers control to the user depending on their desired depth of field (soft background, prominent bokeh, wide range of focus, etc.) and shutter speed (freezing motion, blurred motion, etc.) within permissible ranges.
Press the Menu button to cycle through menu options. Stop when the top line of the display shows “PRIORITY”.
Press the Left or Right button to switch between “A. PRI” (Aperture Priority) or “S.PRI” (Shutter Priority) Mode.
Press the Power/Sample button to save this selection and take a new reading in this mode.
Exposure Compensation
The Reveni Labs Spot Meter has an exposure compensation feature commonly found on digital cameras and cameras with automatic metering. It allows the user to set an “offset” for the exposure, adjusting it up or down to account for environmental conditions.
How much exposure compensation is needed is subjective, and so a photographer may choose to “bracket” their exposure; take the photo multiple times at different exposure levels. When bracketing, often a photographer will shoot 3 shots; 1 at the metered speed, one at 1 stop under, and one at 1 stop over. This ensures the photographer has captured the scene with correct exposure, at the cost of two additional shots.
Press the Menu button to cycle through menu options. Stop when the top line of the display shows “EXPOSURE COMPENSATION”
Press the Left and Right buttons to adjust the compensation value in 1/3 stop increments. This will cause the meter to trend higher or lower, depending on actual lighting conditions.
The exposure can be compensated up or down as much as 3 stops.
Return the value to 0 to remove the exposure compensation.
When set, the exposure compensation value will be displayed at the left-middle of the sample screen, as a reminder. It will disappear when set to 0.
Stop Increments
The Reveni Labs Spot Meter can be set to read out camera settings in whole, half or third stop increments. This gives the user options for setting resolution to suit the available functions on their camera.
If you select “WHOLE + FRACTIONAL” stops the meter will display a subscript number which will count up from 0-9 until the aperture value will roll over to the next whole stop, rather than being rounded up or down to the nearest whole stop.
This function is only available in a whole stop mode.

In this example, extra 1/10th stops above f1 are displayed in subscript (circled red)
Whole Stop Shutter Speeds:
"1h", "30m", "15m", "8m", "4m", "2m", "1m", "30s", "15s", "8s", "4s", "2s", "1s", "2", "4", "8", "15", "30", "60", "125", "250", "500", "1k", "2k", "4k", "8k"
Half Stop Shutter Speeds:
"1h", "45m","30m","23m","15m", "12m", "8m","6m", "4m", "3m", "2m", "1.5m","1m",
"45s","30s", "22.5s","15s", "12s", "8s", "6s", "4s", "3s","2s", "1.5s","1s", "3/4s","2", "3", "4","6", "8", "12", "15", "22",
"30", "45", "60", "90", "125", "180","250", "375","500","750", "1k","1.5k", "2k","3k", "4k","6k", "8k"
Third Stop Shutter Speeds:
"1h","50m","40m","30m","25m","20m", "15m","13m","10m","8m","6m","5m", "4m","3.2m","2.5m",
"2m","1.6m","1.3m", "1m", "50s","40s","30s","25s","20s", "15s","13s","10s", "8s","6s","5s", "4s","3.2s","2.5s",
"2s","1.6s","1.3s", "1s", "0.8s","0.6s","0.5s","0.4s","0.3s", "4","5","6", "8","10","13","15","20","25",
"30","40","50", "60","80","100", "125", "160","200","250","320","400","500","640","800", "1k","1.25k", "1.6k", "2k","2.5k","3.2k", "4k","5k","6.5k", "8k"
Whole Stop Apertures:
"0.7", "1", "1.4", "2", "2.8", "4", "5.6", "8", "11", "16", "22", "32", "45", "64", "90", "128", "180", "256", "360", "512", "720", "1k"
Half Stop Apertures:
"0.7","0.85", "1","1.2", "1.4", "1.7","2","2.4", "2.8","3.4", "4","4.8","5.6","6.7","8","9.5",
"11","13","16","19", "22", "27","32","38", "45","55", "64","77", "90", "109","128", "154", "180", "218","256", "308", "360","436", "512",
"616","720", "860", "1k"
Third Stop Apertures:
"0.7","0.8","0.9", "1", "1.1","1.2","1.4","1.6","1.8",
"2","2.2","2.5", "2.8","3.2","3.6","4","4.5","5.0", "5.6","6.3","7.1", "8","9","10","11","13","14",
"16","18","20", "22", "25","29","32","36","40", "45","51","57", "64","72","81","90","102","114",
"128", "144", "161","180", "205", "220","256","290","313", "360","410","444", "512","581","627",
"720","813","875", "1k"
Config. Menu
Less-often adjusted settings are held in a configuration sub-menu. The settings here are not used in the normal operation of the meter but for adjustments to core functions. To enter this menu, press and hold the Right button and the first setting in the config menu will appear. Hold the Left button to exit the config menu at any time.
Enter Sleep Time / Shut Down Time
The Reveni Labs Spot Meter takes 2 to 3 seconds to turn on, due to a boot-up cycle. It also turns off automatically. In order to balance the power consumption and battery life of the meter, the user can select how long they would like it to stay on for after the last reading is taken or button is pressed.
Enter Sleep time – the time from the last button press to when the screen turns off. Once the screen is off the meter is “sleeping” but will wake instantly on any button press.
Shut down time – the time from last button press to when the meter fully shuts down. Once this time has elapsed, the meter will need 2-3 seconds to boot up from the totally-off state.
Press the Menu button to cycle through menu options. Stop when the top line of the display shows “ENTER SLEEP TIME” or “SHUT DOWN TIME”
Press the Left or Right arrow to increase or decrease the time that the meter will stay on, in seconds.
Note: The timer resets whenever a button is pressed, so the meter will remain on indefinitely if it is consistently being used.
Precision Metering Mode High / Low Limits (Film Latitude/Dynamic Range)
The Precision Metering Mode’s text-based selections are placed upon a sliding scale that correlates to the dynamic range of the film being used. Since this dynamic range varies between films, it is important that the Reveni Labs Spot Meter be adjusted to match. A good base-line range for black and white or colour negative film is +4 and -4. Values of +3 and -3 should be used for positive “slide” film. The high and low values can be set independently of each other.
For example, if the user sets the meter to +3 and – 1, when using P.M.M. a “textureless white” tone will be 3 EV above the calculated middle grey tone, and a “textureless black” tone will be 1 EV below the calculated middle grey tone. The user can do exposure experiments to determine the true dynamic range for any film they use, if they wish.
Sensor Calibration
The Reveni Labs Spot Meter comes factory calibrated, but if the user wishes to adjust it, they can do so. It is not recommended that the user adjust this value and if they wish to make subjective adjustments to exposure use the Exposure Compensation feature instead.
Press the Menu button to cycle through menu options. Stop when the top line of the display shows “SENSOR CALIBRATION”
The bottom line of the display shows the current calibration value. This will have been set from the factory.
Press the Left and Right button to adjust the calibration value. Each increment of the calibration value will change the reading by 0.1EV. It can be adjusted from -2.0 to +2.0 in increments of 0.1.
The original factory setting is written on the manual card provided with the meter. The meter can also be recalibrated by enabling the EV display and comparing against another trusted meter. Calibration metering must be done against an 18% gray reference material.
Reticle X-Position/Y-Position
The reticle is the concentric circles that appear in the center of the sample screen to assist with aiming the meter. These can be adjusted to compensate for any lens/screen/sensor misalignment in the meter. The reticle position is set at the factory and should not need adjustment; however the option is available to the user if they feel that adjustment is needed. Each adjustment up/down/left/right moves the center of the reticle by 1 pixel in that direction. This ensures a small bright object gives the highest reading when centered in the reticle.
Battery Type
Select the battery type you are currently using to correct the battery level readout. LR44 Coin Cells, NiMH AAAs, Alkaline AAAs, or Silver Oxide AAAs.
USB Software Update
Beneath the battery door is a micro USB port, which can be used to update the meter’s software when updates become available. This is the only function the USB port serves.
Warning: USB firmware update on Apple M1-based computers requires macOS Monterey 12.1 or newer.
When connected to a PC running windows 8/10 or Mac, the meter behaves like a USB drive. Please follow the instructions below to connect the meter to the computer. The software file will be named “flash.uf2” and can be copy and pasted onto this USB drive. No other files can be placed there as this is not a true USB device; it is the meter’s CPU presenting itself as one.
IMPORTANT NOTE: If your computer has renamed the file due to a name conflict in your downloads folder (for example, renaming it flash(1).uf2 because flash.uf2 was already taken) delete the old file and rename the new one to fix it, otherwise it will not be recognized by the meter.
Once the file transfer is completed (takes approximately 1 second) the meter will self-eject, reboot and is now running the new software.
Get the latest firmware version here
Update procedure:
1. Open bottom battery door
2. Insert micro USB cable into the USB port (make sure the cable is not a power-only cable and has data lines, most cords included for devices that only need charging (flashlights, earbuds, etc) don’t include data lines. Cell phones, USB hubs, any cable that came with device needing more than just power will have them)
3. The meter will power on automatically
4. Insert a paperclip or small screwdriver tip into the hole next to the micro USB port and double-press the button inside there.

Note the presence of a new USB mass storage device, or that your PC is installing drivers for the newly-attached device
5. Copy and paste the “flash.uf2” file that you received from Reveni Labs onto the device
6. Agree to any prompts about file loss of features or warnings
**The meter will self-eject and restart itself, your computer may warn you of an unsafe device ejection at this point**
7. Once transfer is complete, disconnect the micro USB port from the meter
8. Remove the batteries and wait 10 seconds
9. Reinstall the batteries and battery door
10. Enter the config. Menu and confirm the version number at the top of the screen is now updated.
Service and Repairs
Please contact Reveni Labs directly if your meter requires repair. Reveni Labs is the only company that has the knowledge required to repair a Reveni Labs Spot Meter. Please use the Contact Us link below to get in touch.
https://www.reveni-labs.com/contact
FCC (United States only)
This device complies with Part 15 of the FCC Rules.
Operation is subject to the following two conditions:
(1) this device may not cause harmful interference, and
(2) this device must accept any interference received, including interference that may cause undesired operation
ICES(Canada only)
ICES-003
This Class B digital apparatus complies with Canadian ICES-003.
Operation is subject to the following two conditions: (1) this device may not cause harmful interference and (2) this device must accept any interference received, including interference that may cause undesired operation.
NMB-003
Cet appareil numérique de la classe B est conforme à la norme NMB-003 du Canada. L’utilisation de ce dispositif est autorisée seulement aux conditions suivantes: (1) il ne doit pas produire de brouillage et (2) l’utilisateur du dispositif doit être prêt à accepter tout brouillage radioélectrique reçu, même si ce brouillage est susceptible de compromettre le fonctionnement du dispositif.

This product is designed to meet RoHS compliance regulations
Protect the environment by not
disposing of this product with
household waste (2002/96/EC).
Check your local authority for
recycling advice and facilities
(Europe only).

Safety Warnings
In the event of a malfunction, remove the battery immediately.
If smoke or a bad odor comes from the meter, remove the battery and do not use the meter again without contacting Reveni Labs.
If sending Reveni Labs Spot Meter for repairs, remove the battery first.
Never use the Reveni Labs Spot Meter in an environment containing flammable gasses as there is a danger of explosion or fire.
Do not allow children to play with the Reveni Labs Spot Meter as it and its parts are small enough to present a choking hazard.
Do not allow children to wear the Reveni Labs Spot Meter around their head or neck with a neck strap, as this presents a strangulation danger.
Keep out of reach of children and pets.
Do not insert anything into the Reveni Labs Spot Meter battery opening except for the battery holder. Do not insert a battery without the battery being correctly mounted in the holder.
Do not open the Reveni Labs Spot Meter as it does not contain user-serviceable parts. Damage is likely to occur.